* One 18 1/(2-oz) box of devil's food cake mix * 1 c. peanut butter * 1/3 c. water * 2 x Large eggs * 1 c. peanut butter chips or possibly semisweet chocolate chips or possibly a combination of * both
Boxed Cake Mix Recipe INSTRUCTIONS
1. Preheat oven to 350 degrees. Generously grease cookie sheets. In a large bowl, combine by hand the cake mix, peanut butter, water and Large eggs. Stir till dough is formed. Stir in chips. Drop by teaspoonfuls 2 inches apart onto greased cookie sheets. Bake for 10 to 15 min. Cold 1 minute on cookie sheets. Remove from sheets and cold completely..and the Boxed Cake Mix Recipe is ready to serve...enjoy it !
A cool, creamy, no-bake dessert layered with cake mix, whipped cream, and juicy blueberries. Perfect for warm days or when you want an easy make-ahead treat!
Cover the dish tightly with plastic wrap and refrigerate for at least 4 hours, but overnight gives the best texture.
The crackers soften, flavors meld together, and the cake becomes creamy and sliceable.
Serving Tips
Garnish with fresh blueberries or a drizzle of blueberry sauce.
Serve chilled for best texture.
Store in the refrigerator up to 4 days.
Freezes well—thaw slightly before slicing.
OTHER RECIPES
Creating your own homemade cake mix is a fantastic way to have the convenience of a box mix with the delicious flavor of a from-scratch recipe. This blueberry cake mix is perfect for keeping on hand for a last-minute dessert, for giving as a thoughtful gift, or for simplifying your baking routine.
This recipe creates a dry mix that you can store in your pantry. When you're ready for a fresh, warm blueberry cake, you just need to add a few simple wet ingredients. We use dried blueberries in the mix for shelf stability, but I'll include instructions for using fresh or frozen ones too.
Yields: Enough mix for one 9x9 inch cake or 12 muffins
Prep time (for the mix): 10 minutes
Storage: Store in an airtight container in a cool, dry place for up to 3 months.
Pro Tip: For the best flavor and texture, use freeze-dried blueberries. They rehydrate beautifully in the batter and have a much fresher taste than standard dried berries.
Instructions for Making the Mix
Combine Dry Ingredients: In a large bowl, whisk together the all-purpose flour, granulated sugar, baking powder, baking soda, and salt. Whisking thoroughly ensures that the leavening agents are evenly distributed, which is key for a good rise.
Add the Blueberries: Gently stir the dried or freeze-dried blueberries into the flour mixture. Be careful not to crush them.
Package the Mix: Transfer the mix to a large, airtight jar or a zip-top bag. If giving as a gift, you can layer the ingredients in a clear jar for a beautiful presentation. Attach a tag with the "To Bake" instructions below.
To Bake the Cake (Using Your Mix)
When you're ready to bake, preheat your oven and gather these wet ingredients.
Preheat and Prep: Preheat your oven to 350°F (175°C). Grease and flour a 9x9 inch baking pan, or line it with parchment paper. For muffins, line a 12-cup muffin tin with paper liners.
Combine Wet Ingredients: In a separate medium bowl, whisk together the milk, melted butter, egg, and vanilla extract until just combined.
Combine Wet and Dry: Pour the wet ingredients into the bowl with your cake mix. Using a spatula or wooden spoon, stir until just combined. Do not overmix! A few small lumps in the batter are perfectly fine. Overmixing will result in a tough cake.
Pour and Bake: Pour the batter into your prepared pan and spread it evenly. Bake for 35-45 minutes for a 9x9 cake, or 18-22 minutes for muffins. The cake is done when a toothpick inserted into the center comes out clean or with moist crumbs attached.
Cool: Let the cake cool in the pan for 15 minutes before inverting it onto a wire rack to cool completely. Let muffins cool in the tin for a few minutes before moving to a wire rack.
Tips for Success & Variations
For a Fresh/Frozen Blueberry Cake: If you want to use fresh or frozen blueberries, omit the 1 cup of dried blueberries from the mix. When making the batter, gently fold 1 ½ cups of fresh or frozen (unthawed) blueberries into the batter at the very end.
Add a Streusel Topping: For a delicious, crunchy topping, mix together ½ cup of flour, ¼ cup of brown sugar, ½ tsp cinnamon, and 4 tbsp of cold butter (cut into small cubes). Sprinkle this over the batter before baking.
Lemon Blueberry Variation: Add the zest of one lemon to the dry mix ingredients for a bright, fresh flavor that pairs beautifully with blueberries.
Glaze It: For a simple glaze, whisk together 1 cup of powdered sugar with 1-2 tablespoons of milk or lemon juice until it reaches your desired consistency. Drizzle over the cooled cake.
Cobblers present an excellent fruit dessert alternative that eliminates the need for pie crusts, and I would contend they are even more flavorful. This recipe resembles my Cake Mix Apple Cobbler recipe, but it is simplified further by utilizing canned pie filling.
Although I typically use store-bought cake mix for baking actual cakes, I often incorporate them into recipes like this one, apple cobbler, and Pistachio Bread as a convenient shortcut ingredient. I consider these mixes to be an essential pantry item that can be utilized in numerous ways.
Why You Will Appreciate This Recipe
Straightforward - The use of basic and store-bought ingredients renders this recipe remarkably simple and easy to prepare.
Enjoyable Throughout the Year - The inclusion of canned pie filling enables this dessert to be savored all year long, rather than being restricted to specific fruit seasons.
Tasty - The combination of tartness and sweetness from the cherry filling pairs perfectly with the buttery topping, resulting in a dessert that is guaranteed to delight!
Ingredient Insights
Below are some tips and tricks regarding the ingredients required for this recipe. You can find precise measurements in the recipe card below!
Cherry pie filling - It is essential to select a high-quality canned pie filling, as it is the centerpiece of this dish. An all-natural or no sugar added variety will also suffice. Ensure you use canned pie filling rather than just canned cherries, as the pie filling contains thickening agents necessary for this recipe.
Lemon juice - Canned pie fillings often have a reputation for being excessively sweet. Incorporating some lemon juice will help to balance the sweetness and enhance the flavor of the canned pie filling.
Yellow cake mix- This ingredient imparts a rich, buttery flavor to the cobbler topping. While white cake mix could be an alternative, I prefer the depth of flavor that yellow cake mix provides.
Salted melted butter - This ingredient combines with the cake mix to create an irresistible topping.
This cherry cobbler made with cake mix may very well be the simplest and most delicious cobbler you have ever encountered! It is filled with cherry pie filling and finished with a buttery, cake-like topping. This cherry cobbler prepared with cake mix could possibly be the easiest and tastiest cobbler you have ever tasted! It is generously filled with rich cherry pie filling and adorned with a cakey buttery topping. This straightforward cobbler offers an ideal balance of sweet and tart flavors and requires only three easily accessible ingredients! Most importantly, since it does not depend on fresh fruit, it can be prepared at any time throughout the year, much like my Bisquick peach cobbler. When fresh cherries are in season, do not miss the opportunity to try my cherry crisp! You will not be disappointed ♥ Additionally, consider trying my apple cobbler and strawberry cobbler next!
Cherry cobbler with cake mix served with vanilla ice cream.
What distinguishes a Cherry Dump Cake from a Cherry Cobbler made with Cake Mix? They are remarkably alike and utilize the same ingredients. The distinction lies in the method; a dump cake involves placing the butter in thin slices or drizzling it melted over the top, resulting in a crispy topping akin to a crisp. In contrast, this cobbler combines the cake mix and melted butter to form a crumb topping reminiscent of a cobbler. Cherry cobbler with cake mix and pie filling served with vanilla ice cream. Ingredients Required: - Cherry Pie Filling - White Cake Mix - Butter
Storage and Freezing:
How long can this be stored in the refrigerator?
This cherry cobbler made with cake mix can be kept in the fridge for 3-5 days. Can this be frozen?
Yes, it can be frozen whole or in slices for up to 3 months. Food Safety: For more information on storage tips, you may refer to this link. I adhered to the storage recommendations for "made with the mix" under "cakes" and cherries.
How Can I Tell When the Cobbler Is Finished?
The top will begin to brown, particularly around the edges, and the filling will bubble up at the sides.
cherry cobbler made with cake mix and served with vanilla ice cream
Is It Possible to Prepare Cherry Cobbler with Cake Mix in a Crockpot?
Indeed. Here’s the procedure:
Layer the cherry pie filling at the bottom of the crockpot.
Combine the cake mix with butter and sprinkle it over the cherries.
Cover the crockpot and set it to low for 4 hours or high for 2 hours.
How to Prepare Cherry Cobbler with Cake Mix
Step-by-step instructions on how to create Cherry Cobbler with Cake Mix
Distribute the cherry pie filling in the prepared baking dish.
Combine the cake mix and butter.
Spread the cake mix over the cherry pie filling. Bake.
Refer to the complete instructions below.
Recipe Variations
Almond: I enjoy the combination of cherries and almonds. Consider adding 1/2 teaspoon of almond extract to the cherry filling or incorporating chopped or slivered almonds with the cake mix and butter.
Almond: I enjoy the combination of cherries and almonds. Consider adding 1/2 teaspoon to the cherry filling or incorporating chopped or slivered almonds with the cake mix and butter.
Chocolate Variation: Replace the white cake mix with a chocolate cake mix for a chocolate cherry cobbler.
Browned Butter: For a more decadent, nutty cobbler topping, brown the butter prior to mixing it with the cake mix.
OTHER RECIPES
Ingredients:
2 cans 21 oz cherry pie filling-undrained
1 pkg. white or yellow cake mix
1 stick butter, melted
1 c. nuts (optional)
Directions:
1. Preheat oven to 400 degrees. Pour cherries in bottom of 9x13 inch pan.
2. Sprinkle dry cake mix (usually around 3/4 of bag is enough) over cherries and do not stir.
3. Pour melted butter over cake mix; sprinkle nuts on top.(optional) Do not mix.
4. Bake at 400 degrees for 30 minutes, or until set. Cool. Enjoy the Easy Cherry Cobbler Using Box Cake Mix recipes !!!
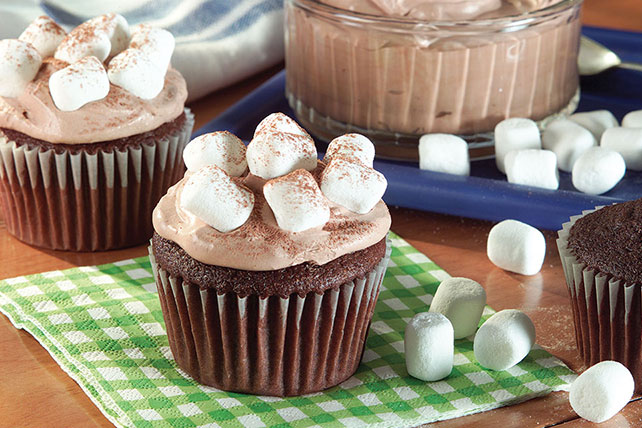
These cupcakes taste like a cozy mug of hot chocolate—rich chocolate cake, fluffy marshmallow topping, cocoa frosting, and decorative touches that feel like sipping warm cocoa on a winter evening.
Add the dry mixture to the wet mixture.
Before fully blending, pour in:
½ cup hot water or hot coffee
Mix gently until batter is silky and thin (this is normal—thin batter = moist cupcakes).
5. Fill & Bake
Fill each liner 2/3 full.
Bake 18–22 minutes, or until the centers spring back.
Cool completely before frosting.
⭐ MAKE THE HOT COCOA FROSTING
1. Cream the Butter
Beat butter 2–3 minutes until pale and fluffy.
2. Add Cocoa + Sugar
Add cocoa powder and powdered sugar slowly.
Beat until smooth.
3. Add Cream + Vanilla
Add cream one spoonful at a time until soft and pipeable.
4. Optional Hot Cocoa Boost
Beat in hot cocoa mix for extra flavor.
⭐ MARSHMALLOW TOPPING OPTIONS (LONG VERSION)
1. Simple Marshmallow Dollop
Spread marshmallow fluff on top of frosting
Torch lightly for a toasted effect
2. Toasted Marshmallow Cap
Place 3–5 mini marshmallows on each cupcake
Torch until golden
They melt slightly into the frosting—delicious!
3. Homemade Marshmallow Frosting
Heat egg whites + sugar over simmering water until warm.
Whip on high speed 5–7 minutes until glossy, marshmallow-like.
Add vanilla.
Pipe tall peaks onto cupcakes.
Toast if desired.
This creates a cloud-like finish!
⭐ ASSEMBLY — HOT COCOA LOOK
Pipe a generous swirl of hot cocoa frosting.
Add mini marshmallows on top.
Torch the marshmallows OR dust them with cocoa powder.
Insert a mini candy cane like a stirring stick.
Add chocolate curls or drizzle melted chocolate.
Lightly dust with hot cocoa mix for extra realism.
⭐ OPTIONAL VARIATIONS (LONGER)
1. Peppermint Hot Cocoa Cupcakes
Add ½ teaspoon peppermint extract to batter
Top with crushed candy cane
2. Salted Caramel Hot Cocoa Cupcakes
Drizzle caramel into the frosting
Add a caramel-filled chocolate inside the cupcake
3. Mocha Marshmallow Cupcakes
Replace hot water with strong espresso
Add espresso powder to frosting
4. S’mores Hot Cocoa Cupcakes
Add graham cracker crumbs to frosting
Insert a chocolate square
Toast marshmallow topping heavily
5. White Hot Chocolate Cupcakes
Use white chocolate frosting
Add pink marshmallows or strawberry dust
⭐ STORAGE
Room Temperature: 1–2 days
Refrigerator: Up to 5 days
Freezer: Cupcakes only (no frosting) up to 2 months
If you want, I can also create:
✅ A printable recipe card
✅ A kids’ party version
✅ A dairy-free or gluten-free version
Just tell me!
ANOTHER RECIPES
These hot chocolate cupcakes are adorned with a delightful marshmallow buttercream, resembling tiny cups of hot cocoa! Featuring a candy cane handle and topped with mini marshmallows, they are a festive treat for the holiday season!
Happy Thanksgiving Eve, everyone. It is astonishing to think that Thanksgiving is upon us, and just around the corner, we have Christmas to anticipate. Time truly seems to be racing by, yet today I find myself feeling somewhat melancholic about it.
One of my closest friends and her family are relocating today, and it feels as though there is a significant void in my heart. You see, in this military lifestyle, the friends we make become akin to family.
You may have heard this sentiment expressed by other military spouses, or perhaps you have experienced it yourself. If so, you understand the sorrow that accompanies saying farewell to a loved one, not knowing when or if your paths will intersect again.
I have been fortunate to forge a small circle of very close friends through the army, friends who are like sisters to me. One of them is departing today, and I am genuinely struggling with this loss.
The most challenging aspect, however, is that I am not the only one losing my best friend. My son is also experiencing a loss.
He and my friend’s son are like two mischievous peas in a pod! They have been friends since preschool, and witnessing their farewell last night was truly heart-wrenching for me. This is primarily because neither of them fully comprehends what is occurring, and also because I realize this is merely the first of many heartaches I will endure on behalf of my little boy.
It amazes me how deeply a mother feels every emotion for her child, even when they are unable to articulate those feelings themselves. Mothers possess such remarkable intuition; it is truly extraordinary.
I apologize for feeling so down today, but I realized that what I truly needed to cope with a situation like this was undoubtedly chocolate. Whenever I sense a significant wave of depression approaching, I find comfort in chocolate, french fries, Stella Rosa wine, and mindless television!
If you wish to find me in the coming weeks, I will likely have one of these indulgences close at hand. Just keep an eye out.
These cupcakes were incredibly enjoyable to prepare, and despite my current sadness, they still manage to bring a smile to my face and fill me with anticipation for the holiday season. I utilized my preferred chocolate cake recipe for the cupcakes and adorned them with a marshmallow buttercream.
The buttercream is airy and creamy, and absolutely delightful. To finish, I sprinkled mini marshmallows, chocolate chips, and crushed candy canes on top, and added a mini candy cane handle. They resemble tiny cups of hot cocoa, and it’s nearly impossible not to smile while holding one. Chocolate truly comes to the rescue, doesn’t it?
*For each mini candy cane handle: I employed a sharp pair of kitchen scissors to trim the hook and bottom of each candy cane until it fit snugly against the side of my cupcake. A sharp knife could also be used for this task.
* 1 (8 ounce) tub COOL WHIP Whipped Topping, thawed
* 1 tablespoon unsweetened cocoa powder
INSTRUCTIONS
1. Prepare and bake cake batter as directed on package for 24 cupcakes; cool completely.
2. Meanwhile, place 1 cup of the marshmallows, the chocolate chunks and milk in large saucepan; cook on low heat until marshmallows and chocolate are completely melted and
mixture is well blended, stirring constantly. Cool at least 30 minutes. Gently stir in whipped topping.
3. Frost cupcakes with the whipped topping mixture; top with the remaining 1 cup marshmallows. Sprinkle evenly with cocoa. Cover and refrigerate until ready to serve. Store
leftover cupcakes in refrigerator.
The boxed mix cake recipe of hot cocoa marsh is ready .....
frog-cupcakes.l

.png)